Nikita 是一个用于自动化部署工作流程的 Node.js 工具包。尽管我们认为它很棒,但我们注意到 Nikita 的文档网站并没有真正为用户提供快速搜索和查找所需信息的方式。Nikita 的内容是开源的,并且文档网站使用 Gatsby 构建,因此我们决定借此机会向你展示如何将一个不错的搜索界面添加到基于 Gatsby 的项目中。
在本教程中,我们将安装 Meilisearch 以及其他一些依赖项。然后,我们将克隆 Nikita 的 Gatsby 存储库,并将 Nikita 的文档索引到 Meilisearch。最后,我们将向我们本地版本的 Nikita 文档添加一个搜索 UI。
你可以在 此 github 仓库 中查看最终代码,包括所有可以运行在服务器上的内容。
设置
在我们开始之前,让我们快速了解一下遵循本教程所需的一切。
介绍我们的工具
Gatsby
Gatsby 是一个基于 React 的开源框架,用于静态网站生成 (SSG)。它结合了 React、GraphQL 和 Webpack 的功能,并提供出色的性能、可扩展性和安全性。
需求
要能够遵循本教程,你需要以下内容
- 一个开放的 终端或命令提示符
- Node.js >= 14.15.X 且 <= 16.X:这使得在浏览器之外运行 JS 成为可能
- 你可以使用命令
node --version检查你的活动版本 - 如果你的 Node 版本超出此范围,我们建议你 安装 nvm 并使用它访问 Node 14
- 你可以使用命令
- Yarn >= 1.22:Yarn 是一个包管理器,同时也是项目管理器
- Docker:Docker 将帮助我们创建具有相对较少努力的工作开发环境
步骤
- 启动 Meilisearch
- 设置 Gatsby 项目
- 添加 Meilisearch 插件
- 将 Gatsby 应用的内容添加到 Meilisearch
- 构建前端
启动 Meilisearch
有多种方法可以 下载和运行 Meilisearch 实例。在本指南中,我们将使用 Docker。想避免本地安装吗?试试我们的 Meilisearch 云,它提供 14 天免费试用期!
在你的机器上安装 Docker 后,获取并运行最新的 Meilisearch 容器镜像。为此,打开你的终端并使用以下命令
docker pull getmeili/meilisearch:latest

docker run -it --rm -p 7700:7700 getmeili/meilisearch:latest ./meilisearch --master-key=masterKey
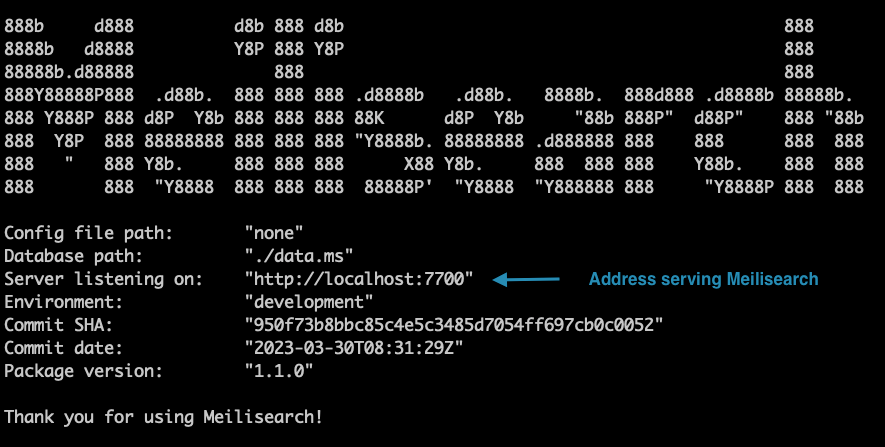
Meilisearch 将开始在 https://:7700 上运行。如果一切顺利,你应该在你的终端窗口中看到类似于以下的内容

设置 Gatsby 项目
Meilisearch 准备就绪后,是时候下载 Nikita 的文档了。
在另一个终端窗口中,导航到你的工作目录,然后克隆我们将用于本指南的 Nikita 项目
git clone https://github.com/adaltas/node-nikita.git
你可以在 docs/content 文件夹内的 markdown 文件中找到 Gatsby 应用的内容。这是 Gatsby 用于生成 Nikita 文档的数据。
 |
|---|
| node-nikita 项目的目录结构 |
添加 Meilisearch 插件并启动 Gatsby
好的:Meilisearch 和 Gatsby 都已安装。我们将从安装所有项目依赖项开始。在你的终端中运行以下命令
cd node-nikita/docs/website
yarn
完成此操作后,我们将使用 Yarn 安装 Gatsby 的官方 Meilisearch 插件
yarn add gatsby-plugin-meilisearch
太棒了!我们准备启动 Gatsby。为此,只需在你的控制台中运行以下命令
yarn develop
这是 Nikita 文档网站的 UI 样子

将 Gatsby 应用的内容添加到 Meilisearch
现在我们已经安装了插件,并且 Gatsby 应用和 Meilisearch 实例都已运行,事情开始变得有趣了!让我们配置 gatsby-meilisearch-plugin 使内容可搜索。
文档网站的主要代码位于 docs/website 目录中。
配置插件
我们需要做的第一件事是将你的 Meilisearch 凭据 添加到 Meilisearch Gatsby 插件。打开 docs/website/gatsby-config.js 并将这段代码添加到 plugins 数组的底部
{
    resolve: 'gatsby-plugin-meilisearch',
    options: {
      host: 'https://:7700', // your host URL goes here
      apiKey: 'masterKey',   // your API key goes here
      indexes: [],
    },
  },
到目前为止,我们的配置告诉插件在哪里找到我们的 Meilisearch 实例,并提供读取 Gatsby 中内容的凭据。现在我们需要定义要添加到 Meilisearch 的数据以及添加方式。这在 indexes 字段 中完成。此字段可以被认为是 Gatsby Meilisearch 插件的核心。
indexes 字段是一个包含多个索引对象的数组。每个索引对象都必须包含以下字段:indexUid、query 和 transformer。让我们来检查一下这些字段。
indexUid
此字段包含 Meilisearch 索引的名称。在本指南中,我们将使用 nikita-api-docs
indexUid: 'nikita-api-docs'
query
此字段包含插件将用于从 Nikita 文档获取内容的 GraphQL 查询。Gatsby 内置支持 GraphQL,它甚至包括一个捆绑的 GraphQL 工具,可以在 (https://:8000/___graphql) 上访问。你可以在项目的官方 文档 上阅读更多关于 GraphQL 的信息。
我们的查询如下所示。
query: `query MyQuery {
    allMdx {
      edges {
        node {
          frontmatter {
            title
            navtitle
            description
          }
          slug
          rawBody
          id
        }
      }
    }
  }`,
在此查询中,我们首先声明我们只对 markdown 文件感兴趣,并将我们的查询用 allMdx 语句包装起来。我们可以做到这一点,这要归功于两个非常有用的工具:gatsby-plugin-mdx 和 gatsby-source-filesystem。
然后,我们指定要包含在索引中的文档字段:title、navtitle、description、slug、id,最后是 rawBody,即文档的原始 markdown 内容。
transformer
这是最后一个配置字段。它使用我们的 query 从 Gatsby 中获取我们获取的数据,并将其转换为 Meilisearch 可以理解的格式。
在我们的例子中,数据看起来有点像这样
data = {
    allMdx: {
        edges: [
          {
            node: {
              frontmatter: {
                title: "Introduction",
                navtitle: "intro",
              },
              body: "Introduction to the Nikita.js",
              slug: "/introduction",
              id: "1",
            },
          },
          {
            node: {
              frontmatter: {
                title: "Architecture",
                navtitle: "architecture",
              },
              body: "Architechture of Nikita.js",
              slug: "/architecture",
              id: "2",
            },
          },
        ],
    },
};
此数据看起来很棒,但它不是 Meilisearch 可以轻松理解的格式。我们可以通过向 transformer 添加一个解析器函数来改变这一点
transformer: (data) => {
    data.allMdx.edges.map(({ node }) => {
      // Node property has been destructured here
      return {
        id: node.id,
        lvl0: node.frontmatter.title,
        lvl1: node.frontmatter.navtitle,
        content: node.body,
        anchor: node.slug,
      };
    });
}
有了它,gatsby-plugin-meilisearch 将获得我们使用查询提取的原始数据,并将整个对象转换为数组。
 // It will return a list of transformed structured object

[
    {
      id: "1",
      lvl0: "Introduction",
      lvl1: "introduction",
      content: "Introduction to the Nikita.js",
      anchor: "/introduction"
    },
    {
      id: "2",
      lvl0: "Architecture",
      lvl1: "architecture",
      content: "Architechture of Nikita.js",
      anchor: "/architecture"
    }
]
将所有内容放在一起并完成插件配置
如果你一直在遵循操作步骤,那么 docs/website/gatsby-config.js 末尾的 gatsby-plugin-meilisearch 配置现在应该看起来像这样
{
  resolve: 'gatsby-plugin-meilisearch',
  options: {
    host: 'https://:7700',
    apiKey: 'masterKey',
    batchSize: 1,
    indexes: [
      {
        indexUid: 'nikita-api-docs',
        settings: {
          searchableAttributes: ['lvl0', 'lvl1', 'lvl2', 'content'],
        },
        transformer: (data) =>
          data.allMdx.edges
            .filter(
              ({ node }) =>
                node.slug.search('guide') !== -1 ||
                node.slug.search('project') !== -1 ||
                node.slug.search('api') !== -1
            )
            .map(({ node }) => {
              // Have to update for versioning
              const currentVersion =
                node.slug.substring(0, 8).search('project') === -1
                  ? '/current'
                  : ''

              return {
                id: node.id,
                lvl0:
                  node.frontmatter.navtitle || node.frontmatter.title || '',
                lvl1:
                  node.frontmatter.title || node.frontmatter.navtitle || '',
                lvl2: node.frontmatter.description || '',
                content: node.rawBody,
                url: `${currentVersion}/${node.slug}`,
              }
            }),
        query: `query MyQuery {
            allMdx {
              edges {
                node {
                  frontmatter {
                    title
                    navtitle
                    description
                  }
                  slug
                  rawBody
                  id
                }
              }
            }
          }`,
      },
    ],
  },
},
我们从将基本数据和凭据添加到 docs/website/gatsby-config.js 开始 gatsby-plugin-meilisearch 的配置。
我们继续配置,指定我们要搜索的内容应该添加到 nikita-api-docs 索引中,使用 GraphQL 查询选择要索引的内容,最后使用 transformer 函数对要索引的数据进行格式化。
构建项目
gatsby-plugin-meilisearch 将在构建过程中获取数据并将其发送到 Meilisearch 以进行索引。要开始构建,请运行以下命令
yarn build
你的内容被索引时,你应该在终端中看到一条消息
success gatsby-plugin-meilisearch - 0.920s - Documents are send to Meilisearch, track the indexing progress using the tasks uids.
你可以通过转到 https://:7700,输入你的 API 密钥,并检查 Nikita 的文档是否已添加到 Meilisearch 来验证这一点。
构建前端
现在数据已经索引了,让我们构建用户界面,为我们的最终用户创建一个很棒的搜索体验。
在此示例中,我们将使用 docs-searchbar.js。它是一个面向 Meilisearch 的前端 SDK,它提供了一种将搜索栏集成到我们的文档网站中的简单方法。
添加搜索栏组件
让我们首先在项目的 frontend 目录中安装 docs-searchbar.js。
# With Yarn
yarn add docs-searchbar.js
完成此操作后,我们可以通过将此添加到文件顶部,将 docs-searchbar 模块导入到 website/src/components/shared/AppBar.js 中
import 'docs-searchbar.js/dist/cdn/docs-searchbar.css'
接下来,我们需要添加一个 useEffect 钩子,将 docsSearchBar 函数添加到 AppBar.js 中。将其添加到其他 useEffect 钩子下方
useEffect(() => {
    if(window !== undefined){
      const docsSearchBar = require('docs-searchbar.js').default

      docsSearchBar({
        hostUrl: 'https://:7700',
        apiKey: 'masterKey',
        indexUid: 'nikita-api-docs',
        inputSelector: '#search-bar-input',
        meilisearchOptions: {
          limit: 5,
        },
        enhancedSearchInput: true,
      })
    }
  }, [])
docsSearchBar 函数附带了许多不同的参数
hostUrl和apiKey允许搜索栏访问你的 Meilisearch 实例。indexUid告诉搜索栏它应该搜索哪个索引。inputSelector是一个选择器,它匹配用户将在其中键入查询的 HTML 元素。在我们的例子中,它是#search-bar-input。别担心,我们将在稍后将此元素添加到 Gatsby 中。- 最后,
enhancedSearchInput告诉docs-searchbar对搜索框应用主题,从而改善其外观并使其更加人性化。
剩下的就是将我们的搜索元素添加到 website/src/components/shared/AppBar.js 中。请记住使用与我们配置为 inputSelector 相同的 id。将该元素添加到 </Link> 标签之后
<input type="search" id="search-bar-input" />
就这样!我们完成了!
测试实现
准备看看所有这些辛苦工作的结果吗?在你的终端中,重新运行以下命令
yarn develop
然后使用你的浏览器访问 https://:8000。你应该看到你本地版本的 NikitaJS 文档,并带有一个全新的搜索栏

结论
我们希望本文能够让你对新的 Meilisearch Gatsby 插件 有一个愉快的了解!
如果你有任何问题,请加入我们的 Discord 频道。有关 Meilisearch 的更多信息,请查看我们的 Github 仓库 和我们的官方 文档。

