

什么是多租户?
在软件开发中,多租户意味着多个用户(也称为租户)共享相同的计算资源,但对系统范围内的数据的访问权限不同。在 Meilisearch 中,您可能拥有一个包含属于许多不同租户的数据的索引。在这种情况下,您的租户必须只能搜索自己的文档。
您可以使用租户令牌实现这一点。
租户令牌
租户令牌是加密数据的少量包,证明用户可以访问某个索引。它们包含安全凭据以及用户被允许查看该索引中哪些文档的说明。
租户令牌的主要用例是根据用户权限强制执行限制。
用户可以使用 Meilisearch SDK 或 自定义代码 生成租户令牌。
租户令牌不需要您配置任何特定实例选项或索引设置。它们也旨在短暂存在——Meilisearch 不存储也不跟踪生成的令牌。
使用 SDK 生成租户令牌时,您需要四个参数
- 搜索规则:搜索规则是一组定义将对使用特定租户令牌进行的每个查询强制执行的搜索参数的说明。
- API 密钥:令牌可以访问与用于生成它的 API 密钥相同的索引。
- API 密钥 uid:用于生成令牌的 API 密钥的 uid 允许检查使用的 API 密钥是否有效。
- 过期日期(可选):租户令牌的过期日期
您可以在 文档 中详细了解租户令牌有效载荷。
要求
创建租户令牌
可以使用 Meilisearch Javascript SDK 中提供的 generateTenantToken 函数创建租户令牌。
以下是用 Meilisearch SDK 创建租户令牌的简单示例
client = new Meilisearch({
	host: "<http://localhost:7700>",
	apiKey: "masterKey"
})
// We have created a Meilisearch instance in JavaScript and we will use this to create the tenant token.

const apiKey = 'rkDxFUHd02193e120218f72cc51a9db62729fdb4003e271f960d1631b54f3426fa8b2595';
const apiKeyUid = '85c3c2f9-bdd6-41f1-abd8-11fcf80e0f76'
const expiresAt = new Date("2025-01-01")
// Now we have declared the API Key, its uid, as well as the expiration date for the token.

searchRules = {
	"*": {
		"filter": "user_id = 1"
	}
}
// Here we have defined the search rules that will apply restrictions on the search results.

tenantToken = client.generateTenantToken(apiKeyUid, searchRules, {
	expiresAt: expiresAt,
	apiKey: apiKey,
})
// Now the generateTenantToken function will create a tenant token and Meilisearch can validate this token with the apiKey.
当 Meilisearch 收到带有租户令牌的搜索查询时,它会对其进行解码并将搜索规则应用于搜索请求。
应用程序使用
假设我们在 Meilisearch 实例中有一个医疗记录系统,其中包含 patient_medical_record 索引。此索引包含患者及其详细信息列表。我们可以使用租户令牌限制对这些数据的访问。
示例数据集
[
	{
	    "patient": "John",
	    "description": "John is in room number 2 and is suffering from Covid",
	    "roomNumber": 1,
	    "isDoctorAppointed": true
	},
	{
	    "patient": "Zia",
	    "description": "Zia is in room number 3 and is suffering from Dengue",
	    "roomNumber": 2,
	    "isDoctorAppointed": true
	},
	{
	    "patient": "Kevin",
	    "description": "Kevin is in room number 4 and is suffering from Typhoid",
	    "roomNumber": 3,
	    "isDoctorAppointed": false
	}
]
在上面的数据集中,我们有三位患者:John、Zia 和 Kevin。目标是限制 Zia 访问 Kevin 和 John 的数据。为此,我们需要为她创建一个带有搜索规则集的租户令牌。
对于这种情况,搜索规则可以指定为
"searchRules": {
      "patient_medical_record": {
          "filter": "patient = Zia"
      }
  }
Zia 的租户令牌将在搜索请求时应用,它将返回
[
	{
	    "patient": "Zia",
	    "description": "Zia is in room number 3 and is suffering from Dengue",
	    "roomNumber": 2,
	    "isDoctorAppointed": true
	}
]
这是一个简单的用例,但我们可以修改规则以满足更复杂的要求。
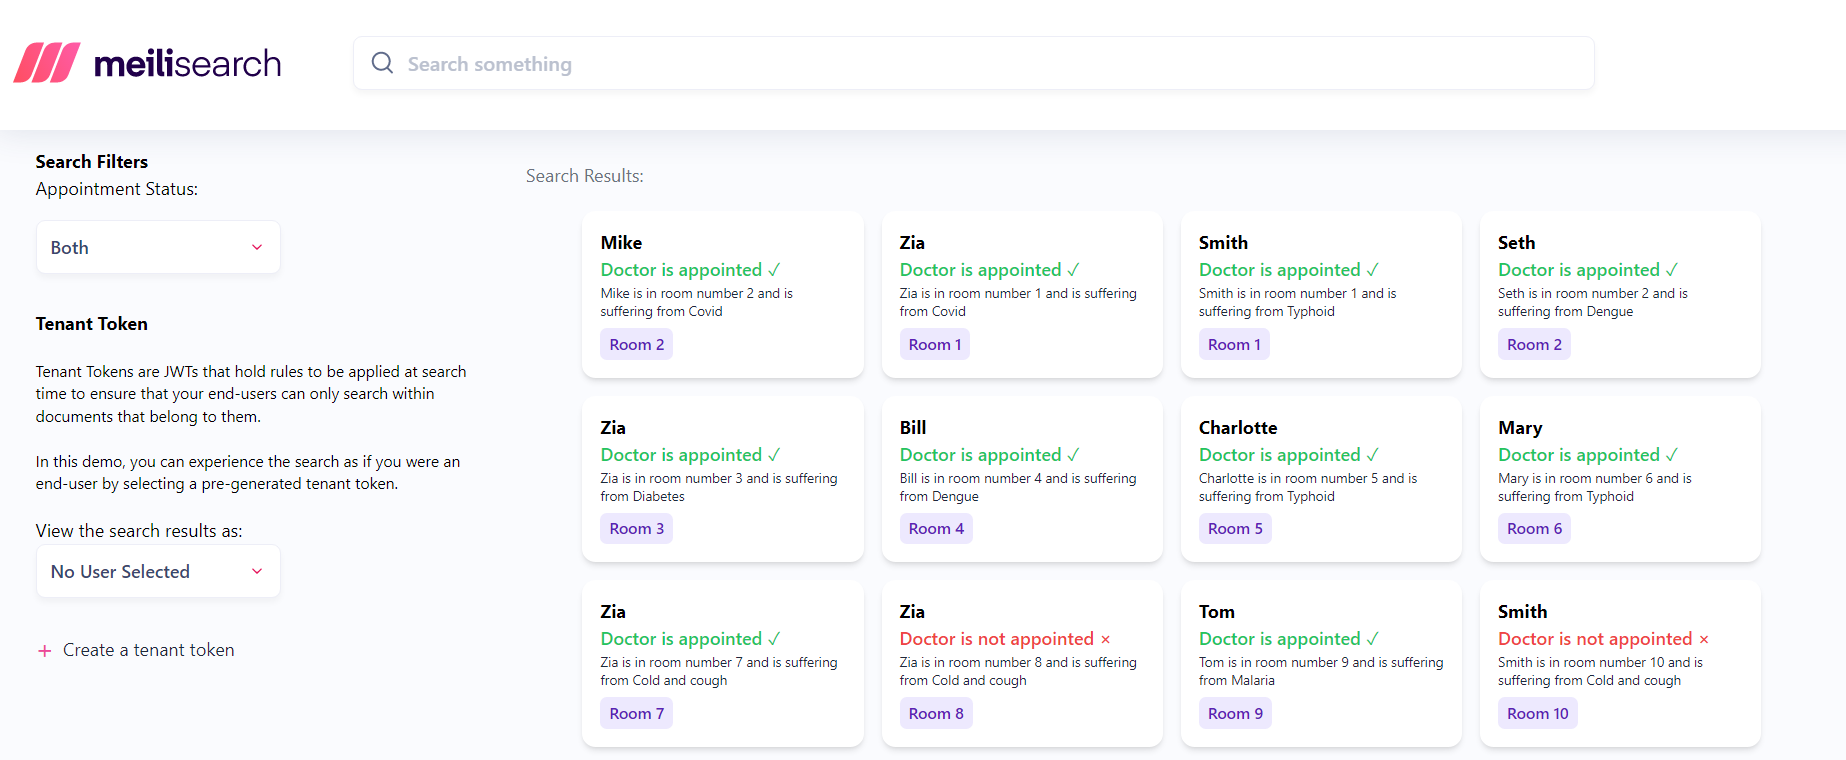
将多租户功能集成到您的应用程序中
我们将使用上面的示例为显示 Meilisearch 索引中的患者创建一个 应用程序。然后,我们将使用多租户来限制对这些数据的访问。
-
下载应用程序
从 Github 上的 Meilisearch 教程存储库克隆演示应用程序的样板代码。
使用以下命令
git clone https://github.com/meilisearch/tutorials样板代码位于
src/tenant-token-tutorial目录中。cd src/tenant-token-tutorial此代码包含在
React.js中构建的前端应用程序和在Express.js/Node.js中构建的后端服务器。 -
启动 Meilisearch
有多种方法可以 下载和运行 Meilisearch 实例。运行 Meilisearch 实例的最简单方法是使用 Meilisearch Cloud,提供 14 天免费试用,无需信用卡。Meilisearch 是开源的,在本演示中,我们将在本地使用 Docker 运行它
docker pull getmeili/meilisearch:v1.0


docker run -it --rm \
    -p 7700:7700 \
    -e MEILI_MASTER_KEY='masterKey'\
    -v $(pwd)/meili_data:/meili_data \
    getmeili/meilisearch:v1.0 \
    meilisearch --env="development"
不要忘记在启动 Meilisearch 时定义一个 主密钥,如上所示。它将创建生成租户令牌所需的 API 密钥。
Meilisearch 实例将在 IP 地址上运行:
http://localhost:7700。 -
向 Meilisearch 添加数据
基本目录的
seed文件夹中有一个data.json文件,其中包含 10 位患者的列表,他们患有多种疾病,有 100 条记录,每条记录都有一个房间号和一些患者详细信息。我们将这些信息输入 Meilisearch。将终端目录更改为
seed文件夹,并使用以下命令将给定的数据添加到 Meilisearch 实例中npm install # This command will install node dependencies npm start # This command will add all the data from data.json to Meilisearch -
启动前端服务器
导航到
frontend文件夹,并安装所有应用程序依赖项和 Meilisearch Javascript SDKnpm install # To install all the react application dependency npm install meilisearch # To install the Meilisearch SDK安装所有项目依赖项可能需要一些时间。
让我们使用以下命令启动前端 React 服务器
npm start应用程序将在 IP 地址上运行:
http://localhost:3000。
-
添加创建租户令牌的功能
导航到
backend文件夹,并使用以下命令安装所有依赖项npm install在
backend文件夹中,打开index.js文件。它包含 API 的路由和逻辑。已经为生成租户令牌定义了一个端点
app.get("/create-tenant-token", async (req, res) => {
  const { value: patientName } = req.query;

  /* Add functionality to create Tenant token */
});
现在,我们将在函数中的注释下方添加功能。
我们需要一个 API 密钥、搜索规则和过期日期来生成租户令牌。
API 密钥可以从 Javascript SDK 中的
getKeys方法获得。getKeys方法返回一个 API 密钥列表,我们可以在其中选择一个用于租户令牌生成过程。为此,请将以下代码添加到上面提到的 API 方法中const { results } = await client.getKeys(); const apiKey = results.filter((res) => res.name === "Default Search API Key")[0].key; const apiKeyUid = results.filter((res) => res.name === "Default Search API Key")[0].uid;我们还可以使用
createKey函数来生成新的 API 密钥。您可以在 Meilisearch 文档 中详细了解 API 密钥。
通过指定搜索规则,我们现在可以生成有效载荷。使用以下代码来定义有效载荷
const payload = {
  patient_medical_record: {
    filter: `patient = ${patientName}`,
  },
};
如果需要令牌在一年后过期,我们可以在创建令牌时设置过期日期,如下所示。
const expiresAt = new Date(
  new Date().setFullYear(new Date().getFullYear() + 1)
);
要生成令牌,我们现在可以使用 Meilisearch Javascript SDK 中的
generateTenantToken函数,并使用res.json() 函数返回生成的令牌。const tenantToken = client.generateTenantToken(apiKeyUid, payload, { apiKey, expiresAt, }); return res.json({ token: tenantToken });端点的实现方式如下
 app.get("/create-tenant-token", async (req, res) => {
  const { value: patientName } = req.query;

  /* Add functionality to create Tenant token */
  const { results } = await client.getKeys();
  const apiKey = results.filter((res) => res.name === "Default Search API Key")[0].key;
  const apiKeyUid = results.filter((res) => res.name === "Default Search API Key")[0].uid;


  const payload = {
    patient_medical_record: {
      filter: `patient = ${patientName}`,
    },
  };

  const expiresAt = new Date(
    new Date().setFullYear(new Date().getFullYear() + 1)
  );

  const tenantToken = client.generateTenantToken(apiKeyUid,payload, {
    apiKey,
    expiresAt,
  });

  return res.json({ token: tenantToken });
});
前端请求的端点如下所示
http://localhost:5001/create-tenant-token?value=John使用 API 中的值
John创建包含搜索规则的有效载荷。让我们使用
npm start命令启动 express API 服务器。服务器将在http://localhost:5001.上运行。 -
将您的 API 与前端代码连接
在文本框中输入患者姓名。提交输入表单后,会向后端发送一个 API 调用,该调用应该返回一个租户令牌。我们可以在需要特定患者的数据时将此令牌传递给 Meilisearch 实例。
现在必须配置前端代码以从服务器请求租户令牌。我们将使用 axios 库 从我们开发的
/create-tenant-tokenAPI 获取令牌,并将患者姓名传递到 API 的参数中。打开
/src/utils文件夹中的index.js文件,并查找getTenantToken函数。此函数向服务器发出请求并接收租户令牌。将以下代码添加到 getTenantToken 方法中
export const getTenantToken = async (patientName) => { const response = await axios({ url: `${apiHost}/create-tenant-token`, method: 'GET', params: { value: patientName, }, }) return response.data.token } -
测试已实现的功能
让我们测试一下实现;首先点击
创建租户令牌按钮。
在给定的文本框中键入姓名
Kevin,然后点击创建租户令牌按钮。这将生成租户令牌。
Meilisearch 将根据患者提供的租户令牌获取数据,在此过程中充当身份验证器。
结论
我们根据患者姓名限制了对医疗记录的访问。使用 Meilisearch 的多租户功能,我们能够轻松执行所有这些操作。这是一个简单的用例场景。功能可以根据您的需要变得更复杂。例如,我们可以在电子银行应用程序中实现多租户,其中中央机构是银行,客户是租户,他们可以访问不同的银行账户。
如果您有任何问题,请加入我们 Discord。有关 Meilisearch 的更多信息,请查看我们的 Github 存储库 和我们的官方 文档。